
travel tips for the disorganized

Believe it or not, I have been known to be a little disorganized at times. [Pause for effect.]
I know, I know, hard to believe. But it’s true!
That being the case, one might conceivably wonder how I’m able to travel from place to place so often.
It hasn’t always been easy – I’ve had lost ID scares, forgotten chargers, forgotten laptops, forgotten underpants. I even forgot jammies once, which normally wouldn’t have been a big deal but in this case I was sharing a room with a coworker. Awkward.
I thought I’d share a list of the things I do when I travel, now that I’ve gotten myself more or less into a routine.
- Take a picture on your phone of your parking spot number and floor (if applicable). Learned this after searching for my car for an hour and a half in the Seatac airport. After that I took a snapshot on my phone and just reference it as soon as I hop off the plane.

- Invest in a quality suitcase, preferably one with four wheels (“spinny suitcases”). Spinny suitcases are God’s gift to the traveler. If you also travel with a laptop bag, get one that has a pocket on the bag that fits over your handle, and travel through the airport will never be easier, I promise. My suitcase, in case you’re wondering, is a 32″ Samsonite that has flown with me over 150,000 miles in the last 3 years. It’s so beat up, it’s not even funny. My laptop bag is a Solo leather bucket bag and fits everything I could need. Fortunately, it just keeps looking better the more beat up it is. This is what a 5 day trip looks like, even including going out gear!
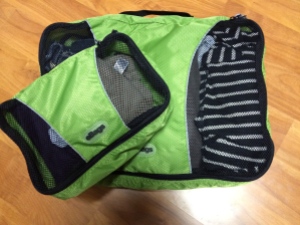
- Packing bags or containers. There are so many different schools of thought on packing…roll your items vs lay everything flat, folding vs stuffing, honestly I don’t know how much it matters. One thing that does make a difference are packing bags. This is what my bags look like. They’re called eBags and you can get them on Amazon. Yay for Amazon!
For the record, I roll. It seems to compress things pretty well and I can usually fit a surprising amount in my suitcase. The bags keep my things separate and prevent them from getting scattered when I am rummaging around inside, and I can use them during the trip to separate dirties from cleans. - Have your ID and boarding pass ready. There is nothing more frustrating to the people behind you and nothing that will fluster you more than searching for your ID and boarding pass when they ask instead of beforehand. Your ID is needed when entering security, but not afterwards so put it away while you’re waiting for your stuff to make it on the black moving belt. Which leads me to my next point…
- Get your boarding pass on your phone. If you have a smart phone, download the app for the airline you’re flying and get your boarding pass on your phone. Every airport I’ve been to has accepted it, and it’s so much faster. Fellow travelers have warned me, however, that electronic boarding passes aren’t always accepted at all airports, so maybe call ahead to confirm. If you can go the electronic route, there is no reason to visit the kiosk in the airport or even to print your pass at home. You don’t even have to do anything but walk into the airport and go straight to your gate if you’re not checking a bag!Protip: If you have an iPhone, use the Passbook feature to load your boarding pass on your home screen. Swipe right to open the boarding pass even without logging into your phone.
- Check in ahead of time. There’s no excuse not to and it’s one less thing to do at the airport. If you do it early enough, sometimes you can get better seats than if you wait to check in at the airport. Every airline I’ve ever flown allows online check in up to 24 hours before your flight. If you do it through the aforementioned smartphone app, you get your boarding pass at the same time!
- Sign up for TSA Precheck. I guess it costs money now, but I was offered it through my preferred airline a while ago, so I would check with your airline to see if there is a process they can help with.
There are a limited number of airlines that offer it (you can see which ones on the TSA website). Visit the TSA website to learn more about the process and how to apply.When you have TSA Pre-check, you don’t have to take off your shoes (except for some types of heels), you can leave your laptop and bag of liquids in your bag, and best of all, you get an expedited line which gets you through security lickety-split. Yeah, I said it. Lickety-split. - Get a multi-purpose jacket. Okay this isn’t strictly necessary but I got this a couple years ago and I love it. It’s a warm-but-not-too-warm jacket when you need it, and it converts into a travel pillow for on the plane! Also, it has a bunch of nifty (labeled!) pockets for everything you’d need to have handy while traveling. I will say mine is black, not purple. Please.
You can get this one at the Exofficio website. It’s light, comfortable, and did I mention the travel pillow part? - Sign up for a mileage plan. Then travel on that airline as often as you can. Personally, I like Alaska. They partner with a bunch of different airlines, and you get miles in your Alaska account whether you fly Alaska, Delta, or American, as long as you provide your Alaska mileage number, either during the booking process or after the flight is booked. It takes less time than you’d think to accrue enough miles to get a free ticket somewhere, and the miles you earn go towards earning you elite status that lets you board early and get other goodies (like free drinks on the plane! Woot!)
- Take pictures of your receipts. Honestly, I’m adding this only because I feel like I have to have 10 tips, and this only applies if you’re traveling for work. This is easier than saving your receipts for expensing later, though. The company that my employer uses for travel reimbursement has a phone app that I use to record my expenses as soon as they happen. I snap a photo of the receipt and attach it to the expense, and voila! I feel so organized.


No Comments